Wednesday, December 28, 2011

Outfit of the Day!

My mom and I went to the mall to get one of these special curling irons for my mom for Christmas. The mall really convicts you to dress so much cooler than you normally would! LOL!

For jewelry, I did a mixture of bracelts. As you can see, I put silver and black bangles with pearls.

 I wore my big black boots
Here's the outfit itself. Please excuse the background...
A fedora, leggings, a belt.

Friday, December 16, 2011

My Gingerbread house!!

I was so surprised at how awesome this turned out! :D

Yay me!!

How to make Christmas Mice


Have you ever been invited to a Christmas party and been expected to bring something? Or wanna give someone a Christmas gift, but can't afford something expensive? Sounds like you need Christmas Mice!
These are so easy and so delicious!


What you'll need:
Melting Chocolate
Cherries *with stems*
Slivered Almonds
Hershey's Kisses (we use the ones with almonds)
Writing Icing (optional)

 First thing you do, is get some melting chocolate. Melt it in the microwave 15-30 seconds at a time. Stir every time it stops. Be very careful to not burn it!!
Or
Melt on the stove in a very small pan on low. Stir often to make sure it doesn't burn.
Next, take your cherries. Dry any juice on it using a paper towl.
Dip just the cherry part in chocolate. Place on wax or parchment paper. Or, if you need to, aluminum foil works good, too. :)

Cover the cherry with chocolate.

While the chocolate is still wet, place a Kiss on the opposite side of the stem. This will be your head;the stem is the tail.

Take one slivered almond and break it in half. The one on the left is a whole slivered almond. The one on the right is one that's broken in half. These will become your ears.


Dip the flat end into the melted chocolate.

Now place them on the Kiss like so. Can't you see the mouse form?
With writing icing, make eyes and a nose.

This is a top view.
And there you go! You're done!

Monday, November 21, 2011

Photoshopped pics

I photoshopped a few pics with Photobucket. Here they are!


Before


After a little color splash

Before

After color splash, once again. :)

Sunday, November 20, 2011

My Score From the Thrift Store!


Look what I got from the DAV/Red Racks yesterday!!

Yay!! I've been wanting a pair of the normal black ones, and I ran across these. I was really excited! They were $8.
Then we went to Kohls, and saw some there on sale for $45.
So yeah, I got a really good deal! Boo-ya!

Friday, November 18, 2011

Since my goal in life at this very moment is to go to cosmetology school to learn to cut hair, fix hair, nails, etc., my mom has been encouraging me to cut my family's hair. I sucessfully did it. Nothing fancy, of course.
But then I cut my hair, which was a lot more than I did to anyone elses. LOL!

Before:
After:


It's still kinda "choppy" because it's freshly cut, but it'll get better.

Facebook: LovedbyHim4EverBlogandWebsite
Website: LovedbyHim4Ever.webs.com
Blog: LovedbyHim4Ever.blogspot.com
Email: LovedbyHim4Ever@live.com

Thursday, November 10, 2011


Today we went and saw Courageous in theaters. I loved my outfit I put together, so I thought I'd do an outfit of the day!


Here's my outfit: An awesome shirt I got from Goodwill! It's white and it has this gold/silver design on the front. But the best part about it is the sleeves. They're like...poofy around the elbows.
I'm wearing a skin-colored cami underneath it. Then blue jean.
No jewelry. I figured jewelry would take attention off the totally awesome shirt. :)

Here, you can see I curled my hair. Also notice my makeup.
My hair kinda reminded me of this girl here.
I don't know who she is, what movie she plays off of, or if she's even IN a movie for that matter! I took this picture from Google...
Anyways, I've always LOVED here hair! I figured today would be a good day to do something like hers.


 Here's a top view of my braid. After I curled it, I've just done a small dutch braid and bobby-pinned it back.


 Now for the makeup, I've done a simple and sweet gold eyeshadow. Along with black eyeliner and some mascara. Anyone want a tutorial? I can do one if requested...


Me, my little sister, Genesis, and my cousins: Grant and Amara. In this pic, we were just goffing off. :P yep, what I do best!

Tuesday, November 8, 2011

Best Eyeliner for the Waterline EVER!!

Today, I'm doing a "Favorite" post about my favorite eyeliner. I've tried lots and lots of different eyeliner for my waterline, and none of them seem to work(gel, pencil, liquid). And if they do work, it's only for like 3 hours, then you can already notice that it's smudging away.

I was on the hunt! I went to Walgreens and asked the lady what would be best. She pointed out Maybelline Unstoppable Eyeliner.
It works wonders!!!
When I first apply this is the morning, I use a Q-tip on my waterline and dry up all the water that's on there. From there, it glides on smoothly! You can't tell a difference in fading until like...7pm! Well, for me, that is.


With that one working great, I figured I'd try this other one. I'd seen it in Seventeen Magazine and figured I'd give it a try. It's the Master Drama by eyestudio eyeliner. Still by Maybelline.
I figured, What could go wrong!? Let's just say...no. It doesn't work nearly as great as the other one! By like 3pm, I was having to reapply it to get it completely black again!
Plus, when you try to twist it up to get the product to come out, it takes FOREVER!! You have to twist up for like five minutes before there's enough to do anything. And once you get it up, you can't put it back in there.


I hope you enjoyed this review! Have a wonderful day!!


Snap-in Feather Extentions-Available at Walmart-Price: $10 for 2 feathers


I bought these at Walmart for $10. I thought they were really cute and pretty cool, too! I don't know anyone that adds feather extentions, so I've never really been serious about getting them. But feather extentions are getting really popular. When I saw these, I figured they'd be a lot like feather extentions.


I tried them out today, and they stayed in my hair the whole day! I barely noticed they were there until I looked into the mirror!


Here's how it works:

This is the clip that holds securly on your hair all day.

  Pull up a section of hair. With the comb part of the clip down, place it securely in your hair by "combing" it through your hair until it feels secure. Once it's secure, clip it by bending both ends down. It snaps into place.
Here's what it looks like when it's in place. It's so thin, you can barely feel it.


Wednesday, November 2, 2011

The Cloak I Made!

I've been working hard. Without a pattern, I'm bound to run into a few errors and roadblocks. But, with determination, I have been thinking how to make a cloak and succeeded! I had to add a few things, and all that fun stuff, but here it is!
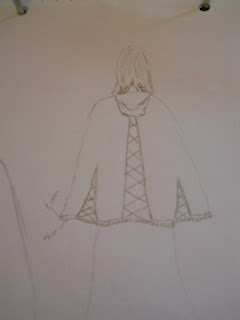
Here's the rough draft I've drawn. It's the picture I had in my head and I just had to get it down on paper. 

Here's the "pattern" I've gone of of. A lady I met about a month ago told me how she made her daughers' cloaks. I instantly fell in love with them when I saw her daughters wearing them.  She said this was what she used, so I drew it, yet again, so I wouldn't forget.

Oh, some advice, if you want it flowing out in the front, try to make it flowier in the front. And, also, when making the "hoodie" part, add an extra 12ish inches. That way, it will give you enough headroom.


 Here are the products I'm using:
Black Fleece
Purple "silky" Fabric
Purple Ribbon (I wanted the ribbon a little thicker, but Walmart didn't have any. :/  )
Black Cord


Here, you can see the "Pattern" I've drawn out. I would suggest using chalk, but I didn't have any.
I've folded it over and pinned it together so I make 2 equal pieces.


Now, I've cut 7 different triangles. 3 smaller ones for each side and 1 very big one for the middle.


Now is when you'll want to cut the black piece. Cut just straight up lines. Then sew in the purple. I also had to add 2 extra panels in at this time.


When you're at the end, add the ribbon!


I've had to add buttons there in the front, to keep the 2 extra panels down.